Finger Painting Lesson on Huawei 4inch smartphone - Mt Landscape
19 Aug 2012|
3245
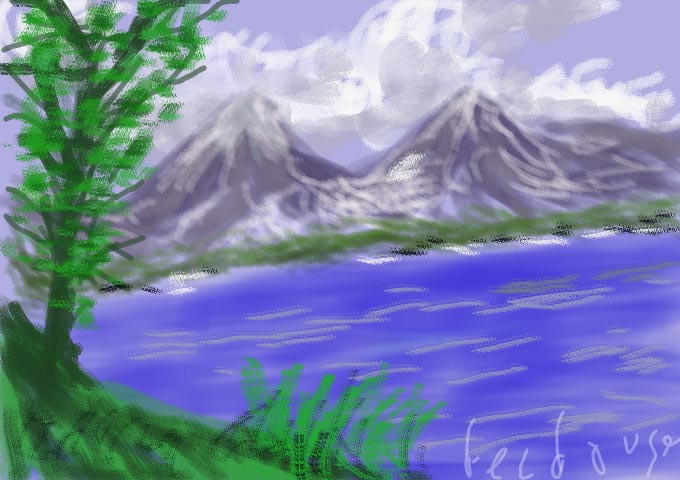
 Fig-1[/caption]
The painting in fig. 1 was produced on a Huawei 4 inch Android smartphone (fig. huawei phone) borrowed from my sister and using my fingers only with the Paintology app.
[caption id="attachment_2299" align="alignright" width="300"]
Fig-1[/caption]
The painting in fig. 1 was produced on a Huawei 4 inch Android smartphone (fig. huawei phone) borrowed from my sister and using my fingers only with the Paintology app.
[caption id="attachment_2299" align="alignright" width="300"] Huawei 4inch Phone[/caption]
Let’s first break down the components of the landscape. We have a cloud cover over two mountain peaks with a wooded area at the foothills facing a lake or sea. In the foreground, we have a hilltop where one could be standing and gazing down at the mountain peaks. In the corner is a tree to give some character to the whole painting.
[caption id="attachment_2301" align="alignright" width="300"]
Huawei 4inch Phone[/caption]
Let’s first break down the components of the landscape. We have a cloud cover over two mountain peaks with a wooded area at the foothills facing a lake or sea. In the foreground, we have a hilltop where one could be standing and gazing down at the mountain peaks. In the corner is a tree to give some character to the whole painting.
[caption id="attachment_2301" align="alignright" width="300"] Fig-2[/caption]
Open up the Paintology app and start by selecting a canvas with the sky blue color and draw in the clouds. For the clouds I used the ‘light haze’ brush tool using a combination of white, light grey and dark grey with a circular motion (fig. 2). Next we pick a grayish color with two tones and work my way down the mountain tops to create the mountain facias shown in fig. 3.
[caption id="attachment_2302" align="alignright" width="300"]
Fig-2[/caption]
Open up the Paintology app and start by selecting a canvas with the sky blue color and draw in the clouds. For the clouds I used the ‘light haze’ brush tool using a combination of white, light grey and dark grey with a circular motion (fig. 2). Next we pick a grayish color with two tones and work my way down the mountain tops to create the mountain facias shown in fig. 3.
[caption id="attachment_2302" align="alignright" width="300"] Fig-3[/caption]
To add depth to the mountains, I pick out a white color and reduce the brush size to produce the snowy caps as well as the snow that trickles down the mountain sides (fig. 4).
[caption id="attachment_2303" align="alignright" width="300"]
Fig-3[/caption]
To add depth to the mountains, I pick out a white color and reduce the brush size to produce the snowy caps as well as the snow that trickles down the mountain sides (fig. 4).
[caption id="attachment_2303" align="alignright" width="300"] Fig-4[/caption]
Next, we use a green, keeping the same brush size to place the green vegetation at the foothills of the mountains (fig. 5).
[caption id="attachment_2304" align="alignright" width="300"]
Fig-4[/caption]
Next, we use a green, keeping the same brush size to place the green vegetation at the foothills of the mountains (fig. 5).
[caption id="attachment_2304" align="alignright" width="300"] Fig-5[/caption]
Notice that I also use a darker shade of green that I pick from the color palette to give it some substance. For the blue sea, I change the brush style to ‘shade’ and select a blue color with a good amount of thickness and brush in the sea area as shown.
[caption id="attachment_2305" align="alignright" width="300"]
Fig-5[/caption]
Notice that I also use a darker shade of green that I pick from the color palette to give it some substance. For the blue sea, I change the brush style to ‘shade’ and select a blue color with a good amount of thickness and brush in the sea area as shown.
[caption id="attachment_2305" align="alignright" width="300"] Fig-6[/caption]
In fig. 6, I sketch in the foreground with a tree using the ‘flower’ brush style and use a combination of light and dark greens. For the bark of the tree, I use a dark brown with increased hardness with a reduced brush size. The branches are produced using a line tool with the appropriate size and hardness keeping with a darker color. Going back to the ‘flower’ brush tool, I had fun doing the leaves on the trees, which basically was just dab dabbing onto the canvas with the finger.
Again, pick a darker green to go over it again and dab dab with a lighter color too. To accentuate the sea and the coastal areas I apply a greyish streak to the sea using the shade tool and light haze (white and black) for the spots on the coastal areas (fig. 7).
[caption id="attachment_2306" align="alignright" width="300"]
Fig-6[/caption]
In fig. 6, I sketch in the foreground with a tree using the ‘flower’ brush style and use a combination of light and dark greens. For the bark of the tree, I use a dark brown with increased hardness with a reduced brush size. The branches are produced using a line tool with the appropriate size and hardness keeping with a darker color. Going back to the ‘flower’ brush tool, I had fun doing the leaves on the trees, which basically was just dab dabbing onto the canvas with the finger.
Again, pick a darker green to go over it again and dab dab with a lighter color too. To accentuate the sea and the coastal areas I apply a greyish streak to the sea using the shade tool and light haze (white and black) for the spots on the coastal areas (fig. 7).
[caption id="attachment_2306" align="alignright" width="300"] Fig-7[/caption]
The final touches to produce the painting in fig. 1 are the grassy areas in the foreground using the ‘flower’ tool with a thin brush size and finally highlighting the blades with a darker color.
The painting was produced in a very short time, but once you get a handle on the basics, just let your creative juices take over and you will be surprised with what you can do! Next time you are on a bus or waiting for someone you can get your smartphone out, open up Paintology and let your artistic talent come into life.
Happy Finger Painting!
Fig-7[/caption]
The final touches to produce the painting in fig. 1 are the grassy areas in the foreground using the ‘flower’ tool with a thin brush size and finally highlighting the blades with a darker color.
The painting was produced in a very short time, but once you get a handle on the basics, just let your creative juices take over and you will be surprised with what you can do! Next time you are on a bus or waiting for someone you can get your smartphone out, open up Paintology and let your artistic talent come into life.
Happy Finger Painting!